How to Rotate the Artboard in Adobe Illustrator
This page may contain links from our sponsors. Here’s how we make money.

If you use Adobe Illustrator while working on projects like designing a brand identity or drawing illustrations, you'll come to a point where you'd like to rotate your whole artwork or canvas. Thankfully, this is pretty simple.
The rotation of the artboard is mostly required in packaging design where your client would like to see the overall design through a totally different point of view or where you, yourself would like to see your design as it comes to designing different sides of the package. The same case can apply to illustrations where one gets to see different results for the same illustration.
So, as an Illustrator user, it's necessary to know how to rotate the artboard while working on any project.
Let's look at the following quick and easy methods to rotate an artboard in Illustrator.
For more on artboards, please see:
- How to Make the Artboard Transparent in Illustrator
- How to Duplicate an Artboard in Illustrator
- How to Move Artboards in Illustrator
Method 1: Use the Rotate View Tool to Rotate an Artboard
Rotating the artboard using the Rotate View Tool is the most used and easy method that you can apply. From your Toolbar, first, you can select the Rotate View Tool. The icon of the tool is shown in the image below.

Note: If you don't see the icon of the tool, you can bring it to the toolbar by going to the Edit toolbar menu. After finding the tool, you can bring it to the toolbar and place it anywhere you like.
After selecting the Rotate View Tool, you simply bring your cursor to the outer boundary of the artboard. Then, you click and hold the left button on the mouse and drag it in a rotating manner. In the center of your working window, you'll see the rotating angle.

When you see that you've reached your desired angle, you simply release the left button on the mouse.
And there you go! You've successfully rotated the artboard.

For the most-used rotating angles, 15, 30, 45, 60, 75, and 90 degrees, you can snap the rotating angle in multiples of 15. For this snapping, you simply need to press and hold the Shift Key on your keyboard while you drag the mouse for rotation.
In the above example, I have rotated the artboard to 45 degrees.

Method 2: Use the View Menu to Rotate an Artboard
If you want to rotate the artboard quickly without using your keyboard to snap the angle or without using the Rotate View Tool, then you can use the Menu Bar to rotate the artboard to 15 degrees or to multiples of 15 degrees.
For this, going to the Menu Bar, you simply go to View > Rotate View.

From the given popped-out menu, select your desired angle.

As in the following example, I have rotated the artboard to 60 degrees.

And that's it. You've just learned to rotate the artboard quickly through the Menu Bar.
Resetting the Rotation of the Artboard
If by any chance, you've accidentally rotated your artboard or you want to bring it back to the default rotation (0 degrees), then you can easily do that too by going to the View Menu.
To understand this, let's take an example of the following artboard that I've just rotated.

Now, to bring it back to the original position or rotation, you simply need to go to the Menu Bar and then go to the View > Reset Rotate View.
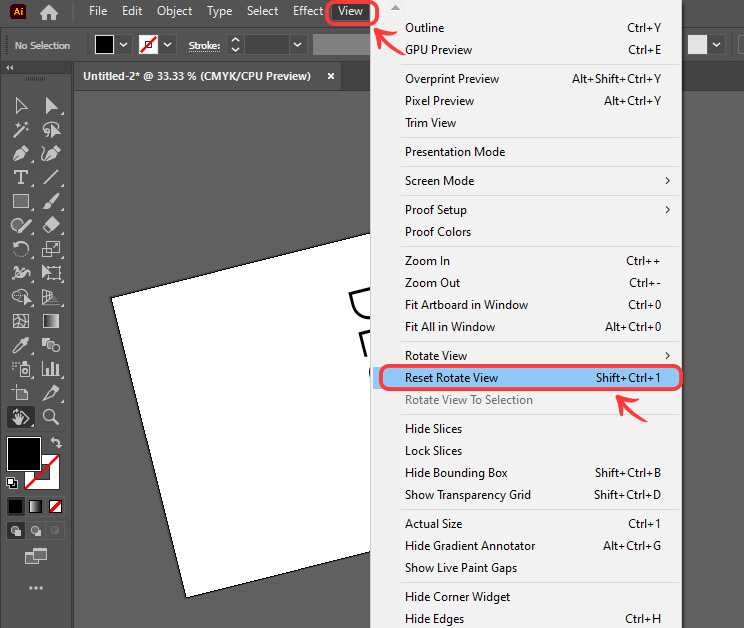
Your artboard will come to its original or initial position.

Final Thoughts
Mostly, the rotation of the artboard is decided before we start our work on the creation of the artboard. The rotations that we can choose while creating the document are Portrait or Landscape. If by any chance you choose that wrong, you can change it by following the same methods to rotate it to 90 degrees.
Consequently, you can rotate your artboard following these methods to produce different and unique designs and illustrations. I hope you create something that brings out something positive in everything.