How to Create a Dotted or Dashed Line in Adobe Illustrator
This page may contain links from our sponsors. Here’s how we make money.
Why download dotted and dashed lines when you can create your own in Illustrator? Creating dotted or dashed lines in Illustrator is way easier than you think. In fact, it's more beneficial to create your dotted or dashed lines as you can always modify the gaps and pattern.
In this article, we will learn how to create dotted or dashed lines. We'll also learn about the tools and panels needed for creating these lines. So, let's begin.
Related reading: How to Create a Dotted Line in Photoshop

The Tools and Panels to Create Dotted & Dashed Lines
Line Segment Tool
This tool is used for drawing straight lines. The Line Segment Tool is located in the left toolbar. You can also access this tool using the keyboard shortcut key (\).
Ellipse Tool
Ellipse Tools are used for making circle shapes. You can find this tool in the left toolbar inside the menu of the Rectangle Tool. The shortcut key to this tool is (L).
Stroke Panel
For the Stroke Panel, there's no separate section. This panel is located within the Appearance panel. The Stroke Panel has various options to customize and stylize your strokes.
Brush Panel
The Brush Panel is located on the right side of the Illustrator. This is a separate panel for modifying the brushes you use. If you cannot find the brush panel along with the others, it's probably because it is not enabled yet. To enable the brush panel, go to Window and select Brushes.
Creating a Dotted Line in Illustrator
Step 1
Select the Ellipse Tool from the left toolbar (L) and create a circle with it.


Step 2
When you're done with creating the circle, click and drag the circle to the Brush Panel.

Step 3
Once you drag the circle to the brush panel, a dialog box will appear on the screen with various brush types. Click Ok.

Step 4
After you click Ok, a new window, “Scatter Brush Options,” will pop up. here you can change the setting of the dotted lines. You can edit the spacing between the dots, the size of the dots, colors, and so on. You can also give a name to this newly created brush. In this case, we're naming it “Dotted Line Brush.”

Step 5
When you finish the brush settings, select the Line Segment Tool (\) from the left toolbar and draw a line. To draw a straight line, hold down the Shift key while drawing the line.


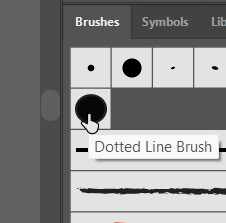
Step 6
Go to the Brush panel and select the brush (Dotted Line Brush) you just created. Selecting this brush will turn the plain straight line into a dotted line.

Creating a Dashed Line in Illustrator
Step 1
Select the Line Segment Tool (\) from the left toolbar and draw a line with it. Select the line you just created.

Step 2
Go to the Appearance panel and click on the Stroke to open the Stroke Panel.

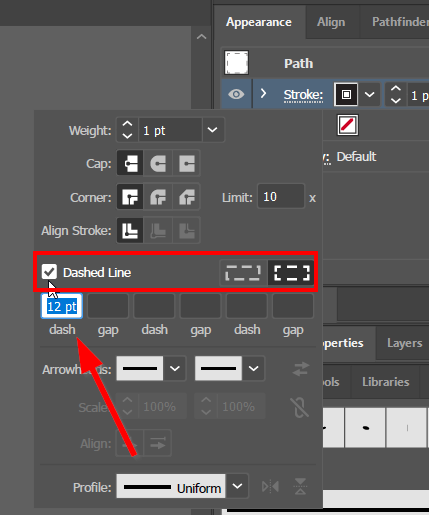
Step 3
In the Stroke Panel, you can adjust the strokes. You can modify how you want your strokes to appear. As for creating a dashed line, check the Dashed Line box. This will change the plain line stroke into a dashed line stroke. Once you choose the dashed line, the selected line will change into a dashed line.

How to Remove a Dashed Line
Removing a dashed line is as simple as creating one. It takes only two simple steps to remove a dashed line.
Step 1
Select the dashed line using the Selection Tool.
Step 2
Go to Appearance > Stroke and uncheck the dashed line box.
Creating dashed lines or dotted lines in Illustrator gives you more flexibility in changing the size and spacing. And it's much easier to create than using images from other sites. So save yourself some and create your own dotted or dashed lines following these methods.