How to Make a Dotted Line in Photoshop (Quick Tutorial)
This page may contain links from our sponsors. Here’s how we make money.
Making a dotted line or dashed line in Illustrator is easy—you just change it in the stroke palette. Photoshop, on the other hand, is a bit trickier.
There's more than one way to do it, but I want to show you how to quickly make a dotted line in Photoshop. Although, you can create lines manually by repeating the dots. But, Adobe Photoshop makes it quite easier to craft curved or straight dotted lines through the formulated procedure.
If you've ever made a Photoshop mock-up of a website before getting your hands dirty with code, this little trick may come in handy. The brush tool has been used to craft a line that is dotted or dashed. Consequently, you can create continuous spaces between the lines and craft a perfectly straight line.
This is a very simple tutorial that takes a few steps and adjustments to yield the results.
1. Open Your Brushes Palette in Adobe Photoshop
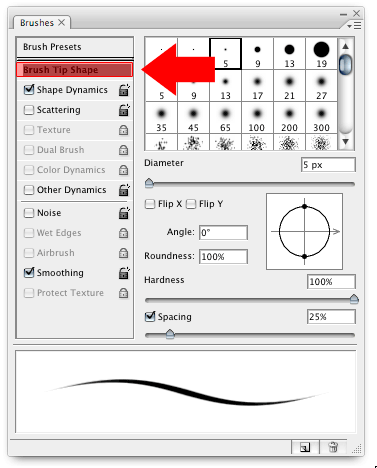
Yep, you will be using a brush for this quick trick. Open your brush palette by going to Window > Brushes, or hit F5 on your keyboard. Once open, click on “Brush Tip Shape” within the Brushes palette and select a very small brush, like 1-5px.

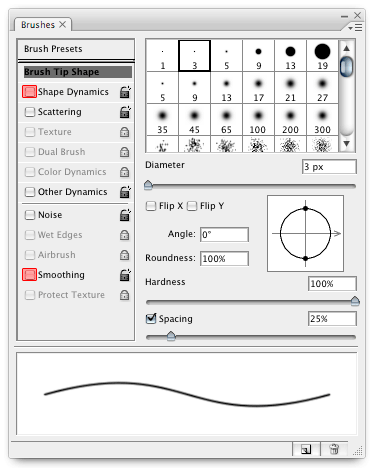
2. Uncheck Shape Dynamics and Smoothing
You can adjust each and every aspect properly and exactly to achieve a perfect dotted line according to your own needs and desires.

3. Adjust the “Spacing” to Create the Dotted Line with Brush Tool
This part is up to you and depends on your desired effect. Pay no attention to the waves in the preview. It's the default preview. All you need to be worried about here is the amount of space between the dots. The spacing slider can be used to adjust the spacing between the lines.

4. Choose Your Brush Color
If you haven't already, choose the brush tool in the tools palette, or hit B on the keyboard. Also, ensure you select a color for your brush, which would be the foreground color. ( I chose black. )

5. Hold Shift and Drag to Draw a Line
With the brush tool, hold shift, drag and bam, perfect dotted line!

A perfectly-centered straight line will be achieved through this procedure. You don't need to use the pen tool, stroke options, or anything else that may be complicated. Now that you know this trick, making dotted lines is easy. You can also easily create a dashed line in Photoshop by selecting a rectangular brush instead of a round brush.
