How to Make a Pattern in Adobe Photoshop
This page may contain links from our sponsors. Here’s how we make money.
Seamless patterns (also called tileable or repeating patterns) can be extremely useful in your design work. Being “seamless” means that when the pattern is repeated on the canvas, the repetition cannot be seen and there is visually no beginning or end to the pattern. Also, it means that we can paste that pattern on as large of a canvas or frame as we would like. These patterns are limitless.
At first glance, you might get the idea that making seamless patterns would be difficult so that when they're placed side by side, differentiating the two tiles of one pattern becomes impossible. But when you understand completely how this works, it becomes very easy for you to create as many patterns as you need. In this, 5-7 minutes tutorial on making patterns, you'll not only learn about the basics of making a pattern in Adobe Photoshop, but you'll also learn to save custom-made patterns in the Photoshop library.
Are you an Illustrator user? See our tutorial on How to Make a Seamless Pattern in Illustrator.
Patterns in Photoshop
Photoshop comes with a pre-made pattern set like the brushes, shapes, and presets. You can use those patterns wherever you like, and you can create your own and save them in that library for future use.
Patterns are everywhere. You can see them on clothes and fabric. Or you can notice them on the buildings around you. In the interior of a house, tiles also seem to be designed as patterns. If you start noticing everything around you, you'll find patterns everywhere. That means, for a designer, it becomes crucial to master the skill of making the pattern. So, without any further ado, let's get into the tutorial.
How to Make a Pattern in Photoshop
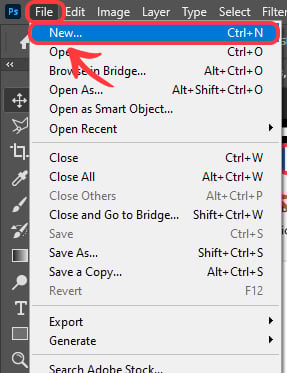
To make a pattern, we need to start from the very beginning. Like any other graphic design project in Photoshop, first, we must create a new blank document. For that, we'll go to, “File >New” by going to the Menu Bar.
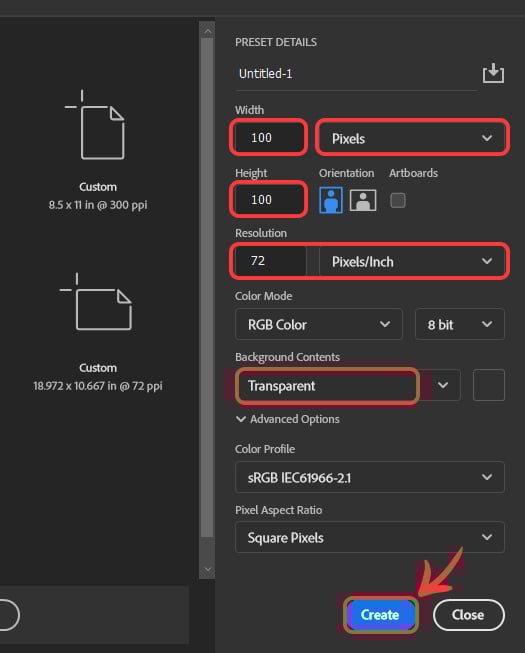
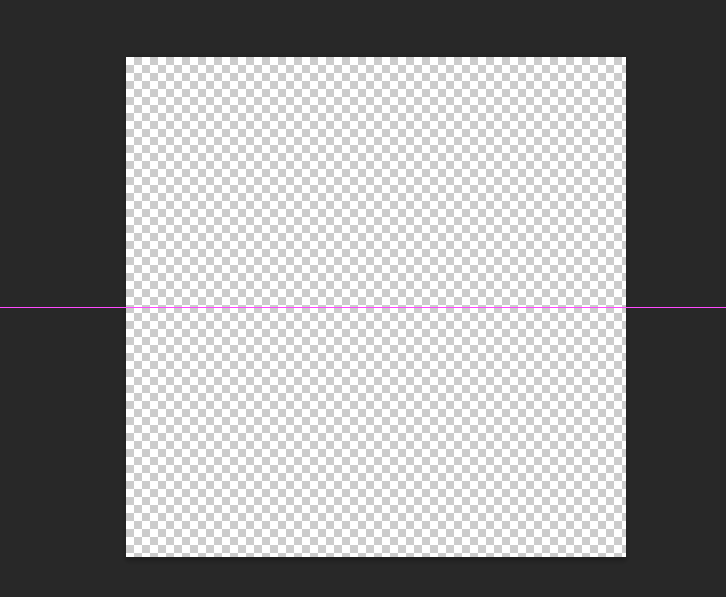
Next, in the newly opened dialogue, select Pixels as the sizing unit of the document and enter 100 pixels as the value in both the width and height of the document. (You can change these values but keep in mind that your document should be square in size.) Enter the resolution value of 72 Pixels/Inch (You can also make it higher if you prefer). Set the Background Content as Transparent to create a document without any background. Then simply click on Create.
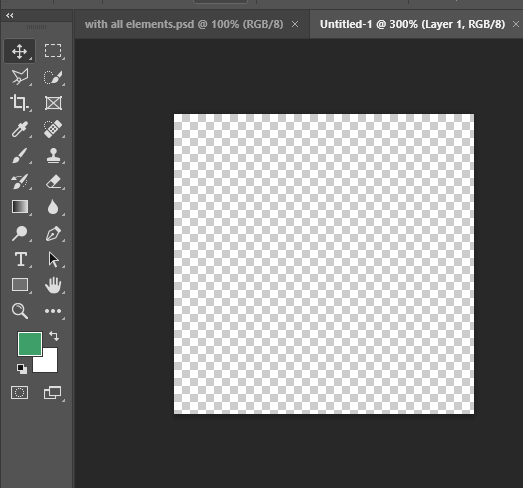
A new transparent document with a transparent background that looks like a checkerboard will be created based on the values you've entered.
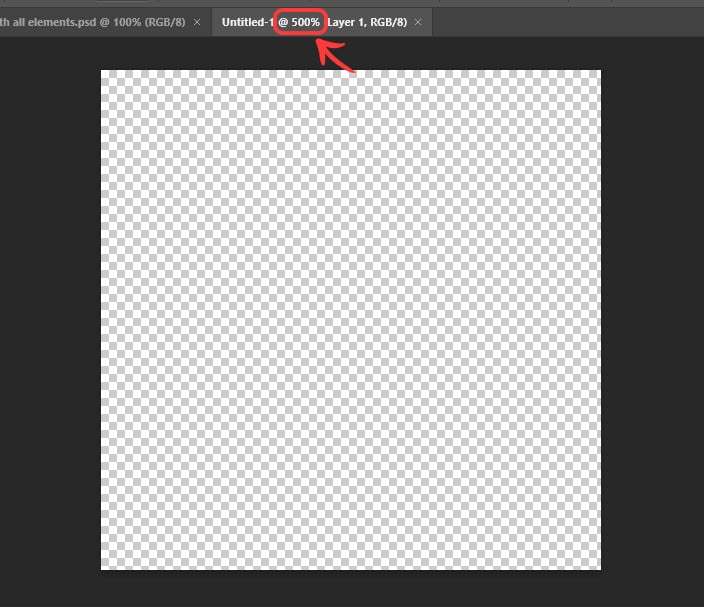
Now, we need to zoom in on this document to 500%. To do this, simply press and hold the Control and Spacebar Keys. Your cursor will change into the Zoom Tool. Now you can zoom in or out by pressing and holding the left button on your mouse and then dragging it to either the right or left side to zoom in or out. Or, simply click four times on the document and it will automatically get zoomed in to 500%.
Next, we add the guides through the center of the document. To do this, we simply go to, “View > Guides > New Guides” from the Menu Bar.

A new window will be opened named, New Guide.

Now we need to add the horizontal and vertical guides in the center of the document. To do this, first I will be adding the Horizontal Guide. I will select horizontal, and put the value of 50 in the position box. Also I would change the color of the guide to Magenta as for me it becomes difficult to see the Cyan Guides (this is personal preference). Then finally, click Ok.

You'll see that a horizontal guide will be created that goes through the center of the document.
Similarly, we'll add the vertical guides following the same steps. But this time, select the Vertical option instead of the Horizontal one in the New Guide Dialogue Box. The document will look as follows, with both guides added.
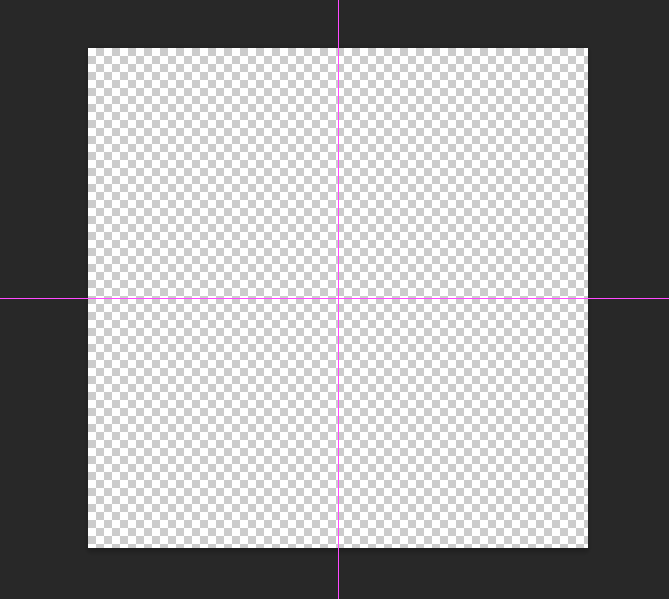
Now, the center of the document is quite visible to us and it's the point where horizontal and vertical guides meet, Next, we'll draw or create a new shape, design, or graphic in the center of the document.
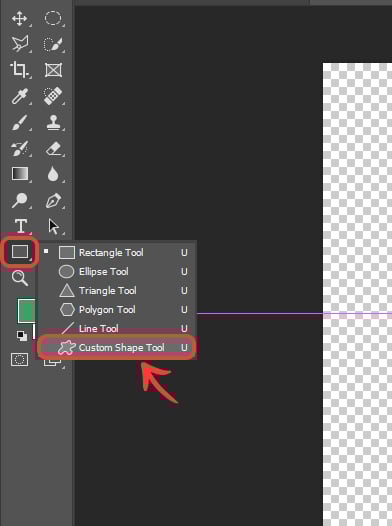
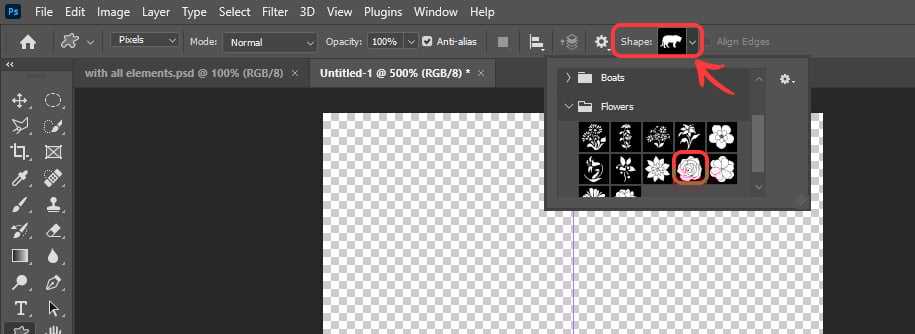
The shape could be of any type. It could range from simple shapes to complex ones. We can hover into the Custom Shape Tool in Adobe Photoshop to add the built-in, complex shapes to the document. You can find the Custom Shape Tool under the rectangles tool in the Tool Bar or Tool Panel.
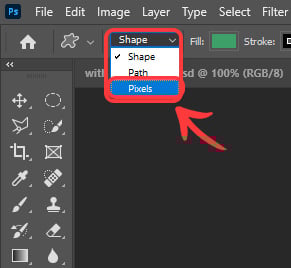
With the tool, we'll add one of the pre-made shapes that Photoshop provides us within the Custom Shape Tool. This tool gives us three modes of drawing shape options, which are Shape mode, Path mode, and Pixel mode. We'll use Pixel Mode because Photoshop only allows us to add patterns that are pixels based. As you select the tool, you can switch between these three modes by going to the top left corner of the options bar down to the Menu Bar.
Next, we'll select the shape type from the options bar. Click on that. A window will be opened below. Select any of the shapes from there (I have selected a flower shape). To select the shape, simply click on the shape's icon.
Before you proceed, make sure what color would you like your shape to be. You can change the foreground color from the Tool Panel because the shape you draw will be filled by the foreground color you've already selected in the Tool Panel. I have selected a green color as my foreground color, and the background remains white.

Now, simply bring your cursor to the center of the document and draw a shape by clicking and holding the left button on your mouse, then dragging it. We will see that the flower will be drawn on the document and it will be filled with the color we have selected as the foreground color.
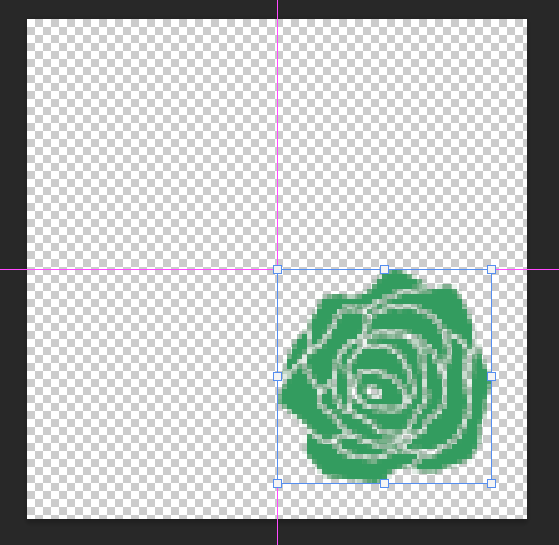
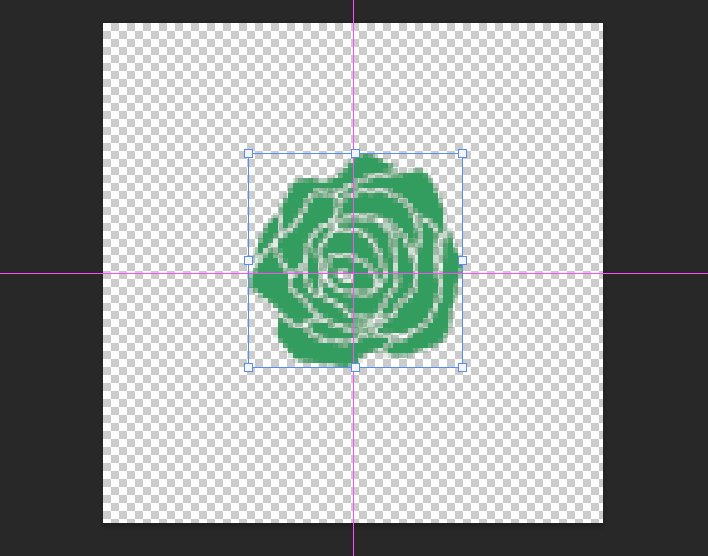
Our shape does not lie directly in the center. There's no need to worry about it. We can bring it to the center by selecting it with the Selection Tool and dragging it to the center.
Next, we'll duplicate the layer by selecting it in the Layers Panel and using the shortcut, “Control + J” (For Windows) / “Command + J” (For Mac). Or simply, right click on the layer and then select the “duplicate layer” from the panel, then click Ok. You'll see two identical layers in the Layers Panel.

Now, to make our pattern seamless, we need to provide the Offset Filter to the newly duplicated layer. The filter will be provided such that the four parts of shape will be placed at the four corners of the document. For this, go to “Filter > Others > Offset” from the Menu Bar.

In the Offset dialogue box, put in the value of 50 in the horizontal as well as the vertical value boxes. Select Wrap Around from the down of the dialogue box. Then Click Ok.
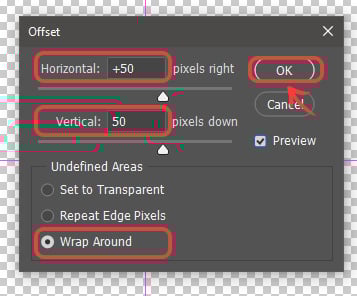
As you click Ok, you'll see that the copy of the original shape in the center will be split into 4 parts, and these will be placed in the 4 corners of the document.

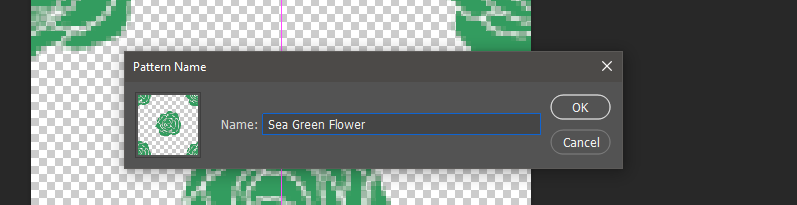
The repeating tile is ready! Now we simply need to save it as a pattern and apply it on another document or canvas to see if it works as a seamless pattern or not. To save it as a pattern, go to, “Edit > Define Pattern” in the Menu Bar.

In the new window, name your pattern. It's good to name every pattern you make in Photoshop. Type the name and click on OK. Your pattern will be saved in the pattern library.
Next, we create a new canvas of any size with a white background. To do this, simply go to, “File > New” from the Menu Bar. In the new dialogue window, select the size you want and select White as Background Contents. Then simply click Create.

A new white canvas will be created.

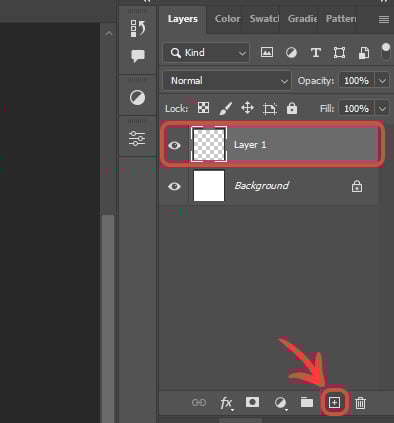
Now, we add a new layer on the canvas. For this, go to the Layers Panel and simply click on the New Layer Icon on the bottom of the Layers Panel. A transparent layer will be created above the white layer.
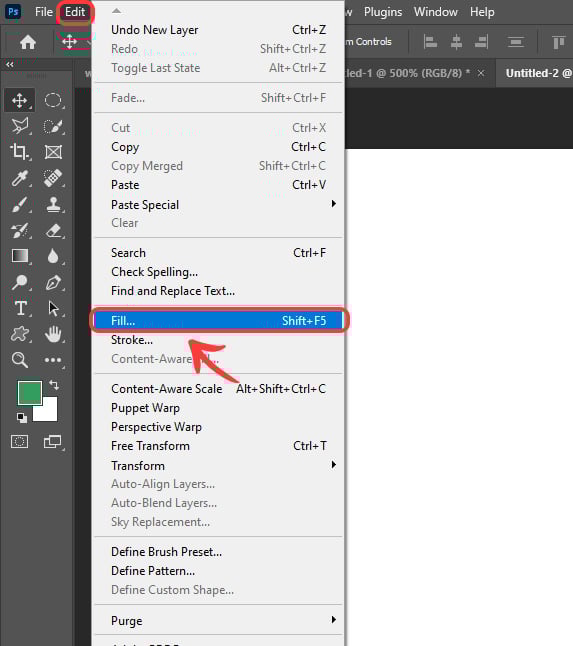
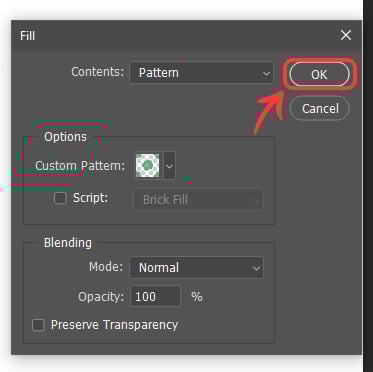
Lastly, we'll fill the new transparent layer with the pattern we've just created. To do this, we select the new layer and then go to, “Edit > Fill” from the Menu Bar.
The Fill dialogue box will appear after you click on the Fill button. From there, you can select Pattern as the Content, and select the saved pattern by clicking on the already selected pattern icon in the box and then double-clicking on the icon of your custom-made pattern.
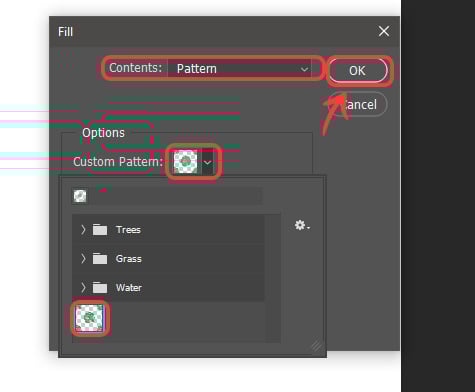
Leave the other settings as it was in the default mode. Then simply click on OK.
As you click on OK, you'll notice that on the new transparent layer, the pattern will be applied, and the white background layer remains intact. We see that in the applied pattern, we can not differentiate between the tiles, and it proves that our pattern is seamless.

Final Thoughts on Patterns in Photoshop
You've just learned how you can make a seamless pattern in Adobe Photoshop. There are a lot more options and possibilities in Photoshop you can follow to create more interesting and complex patterns. You can add more colors and gradients if you like, to meet the requirements of your design projects, or you can make custom handmade patterns for your seamless designs. Just keep practicing and exploring your way to learn new tools by playing with them.