How to Make the Background Transparent in Illustrator
This page may contain links from our sponsors. Here’s how we make money.
Having a white background can be helpful when you're working on your design, as it creates a clear vision for you to see. However, the white background creates obstacles when using the image in other designs. In such cases, we often search for an image with a transparent background. Fortunately, Illustrator can save us time by removing the white background and giving our design a transparent background.
In this article, we'll learn how to make the background transparent in Illustrator.
Illustrator comes with a tool called Image Trace, which allows us to convert an image to a vector graphic and remove the white background.
We'll be using these two images in the tutorial. Download them from Vecteezy if you'd like to follow along.
Image Trace
Image trace converts any image (JPEG, PNG, etc.) to a vector graphic. It helps you convert the raster image into an editable vector image that you can edit. To enable Image Trace, go to Window on the overhead menu and choose Image Trace. A new panel for image tracing will appear on the right side of the interface.
Transparent Background from Image Tracing
Step 1
Place the image on the artboard. Press Shift + Ctrl + D (PC) or Shift + Cmd + D (Mac) to enable the transparent grid.

Step 2
Select the Selection Tool (keyboard shortcut V) from the left toolbar and select the image. Go to the Window menu on the overhead toolbar and select Image Trace from the drop-down menu.

Step 3
Once you select the Image Trace, a window of image tracing will appear on the screen. Change the mode from Black and White to Color. Then extend the Advance menu, go to the Options section, and check the box next to the Ignore White option.

Step 4
After completing the settings, click Trace to initiate the trace.


Make the Background Transparent by Deleting Points
Step 1
Trace the image if it's not a vector image. Select the image, and go to Window > Image Trace. Make the necessary changes as we did in the previous method.
Step 2
Go to the View menu on the overhead toolbar and select Show Transparency Grid. Alternatively, you can enable the transparency grid using the keyboard shortcut Shift + Ctrl + D. We need to do this step to delete the background later.

Step 3
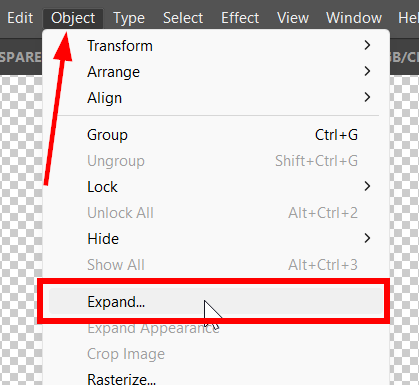
Select the image using the Selection Tool. Go to the Object menu on the overhead toolbar and select Expand from the drop-down menu. After you expand the image, all the points will appear on your image.
Step 4
Using the Direct Selection tool (keyboard shortcut A), select the points from the background area you want to remove. Make sure you don't miss any points while selecting. Hold down the Shift key while selecting if you need to make multiple selections.

Step 5
Once you're done selecting the background, press Delete. This will remove the image's selected part, leaving you with a transparent background. Don't worry if you fail to select all the points at once. You can select the points again and delete them.

After you remove the background from your image, you can keep working with it or save it as a PNG or SVG for later use.
How to Export Your Image with a Transparent Background
If you want to save the image with transparent background, save it as a PNG or SVG form. Follow the instructions given below:
- Go to the File on the overhead toolbar.
- Click on Export from the drop-down menu and select Export As from the extended menu.
- A Save As window will appear on the screen. Select the location where you want to save it and give a name to the file.
- Go to the Save As Type menu and change it to PNG format.
- Click Export. A new window with PNG format options will appear on the screen.
- In the Preview option, select the background color as Transparent.
- Click Ok to finally save the image with a transparent background.

Removing the white background and replacing it with a transparent one is essential if you plan to use the element seamlessly in another design. Illustrator comes to the rescue again by providing a solution for this issue. I hope this article has helped you achieve your goal of creating a transparent background.