How to Make a Grid in Adobe Illustrator (Rectangular and Polar)
This page may contain links from our sponsors. Here’s how we make money.
Are you looking for a way to create an effective grid system in Adobe Illustrator? If so, then you've come to the right place! This quick tutorial will teach you how to make a comprehensive and visually appealing grid using the popular vector graphics software.
While creating grids manually can be time-consuming, with this tutorial, it takes only minutes — no matter your level of design experience. Keep reading as we’ll take you through a few simple steps make a grid in Illustrator. In just a few minutes, you'll know exactly how to craft beautiful designs with custom Illustrator grids in no time!
Overview of Adobe Illustrator Grid Tools
Illustrator's Grid Tool helps the user to quickly and accurately draw evenly-spaced rows and columns. These grids allow the user to align artwork and objects precisely and accurately without committing any mistakes. These rulers help you divide a page into thirds, quarters, fifths, sixths, sevenths, and more – with no guesswork.
There are many scenarios when grids will be helpful. For example, if you're designing a simple table.
How to Use Adobe Illustrator's Grid Tools
We can use two grid tools to create grids in Illustrator. Those are the Rectangular Grid Tool and Polar Grid Tool. If you want to create rectangular grids (horizontal and vertical lines) in Illustrator, use the Rectangular Grid Tool. If you want to create circular grids in Illustrator, use the Polar Grid Tool.
Simply click and hold the Line Segment Tool or use the keyboard shortcut (\) to select either of these tools.

If you do not see those tools, you need to go to Window > Toolbars > Advanced. After selecting them, you can see these tools in Illustrator.

How to Make a Rectangular Grid in Illustrator
We can create a rectangular grid system in two steps.
If you want, you can create a freehand grid or input the exact value when you already know how big a grid should be.
Step: 1
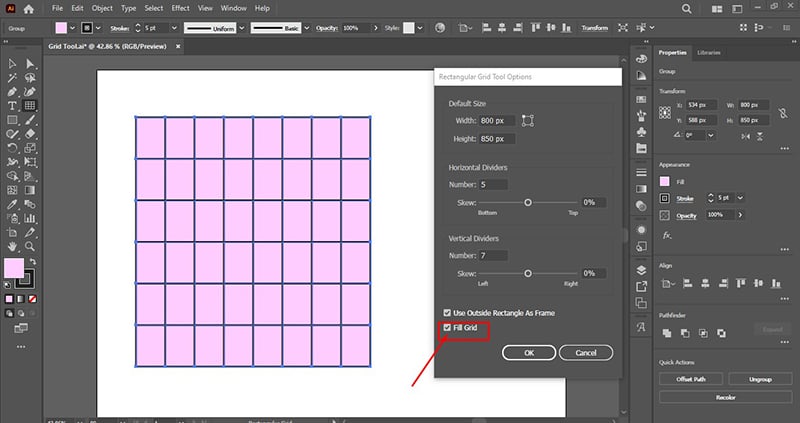
Select the Rectangular Grid Tool and click on your artboard. Then you can see the Rectangular Grid Tool Options window. In this section, you can input the settings for the grid you create.
You can set the size of your grid using the Width and Height settings. You can set your grid reference point from one of the four points (red arrow below). Or, after selecting the Rectangular Grid Tool, you can just drag on your artboard while pressing the Shift key.

Step: 2
If you already know your grid size, set the number of horizontal lines between the top and bottom gridlines using the Number input box in the Horizontal Dividers section.
In the Vertical Dividers section, enter the number of vertical lines between the left-side and right-side grid lines using the Number input box. When you finish the grid settings, hit the OK button or press Enter on the keyboard.

Also, If you want to use the Skew slider on your Illustrator grid box, you can do that. From the Skew slider, set how horizontal lines are weighted toward the top or bottom of the grid and how your vertical lines are weighted left or right.

If you want to Fill the Grid box, just check Fill Grid Box. It will be filled with your fill color.

How to Use the Polar Grid Tool in Illustrator (Circle Grid)
Step: 1
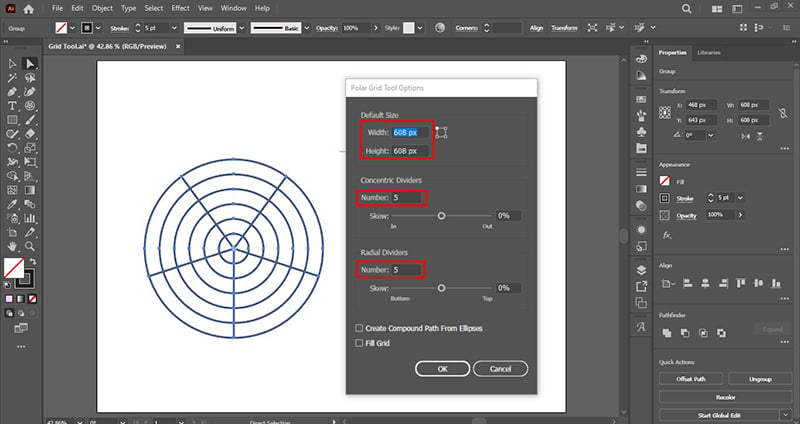
To create a circle grid in Illustrator, you'll use the Polar Grid Tool (another name for a circular grid). Creating a polar grid uses the same process shown above for the rectangular grid. Select the Polar Grid Tool and click on your artboard. Now you can see the Polar Grid Tool Options window. In this section, you can apply the settings for the grid you want to create.
You can set the size of your grid using the Width and Height settings. You can set your grid reference point from one of the four points next to the height and width settings.
Alternatively, after selecting Polar Grid Tool, you can just drag on your artboard and pressing the Shift key.

Step: 2
If you already know your grid size, set the Number input box in the Concentric Dividers section to add additional concentric circles.
In the Number input box, set the number of straight lines between the center and edge of the grid in the Radial Dividers section.
And an important part of the Polar Grid, Width and Height stay the same.

In the same way, you can change the Skew slider.
In the Concentric Dividers section, use the Skew slider to adjust how your concentric circles are weighted towards the inside or outside.
In the Radial Dividers section, use the Skew slider to adjust the weight of straight lines counterclockwise or clockwise.

If you check the Fill Grid box, your radial grid will be filled with the current fill color.

Frequently Asked Questions
The polar grid tool is available as a drop-down under the line segment tool.
The rectangular grid tool is available as a drop-down under the line segment tool.
Final Thoughts on Adobe Illustrator Grids
In this tutorial, you learned how to create a grid in Illustrator. When you know how to use the Grid tool in Adobe Illustrator, you can create an interesting drawing for your artwork and make it more effective. As a result, you can save time while working on many projects.
Related reading:
