How to Sync Photoshop Presets on Multiple Computers
This page may contain links from our sponsors. Here’s how we make money.
If you have multiple computers, and you use both of them quite frequently (like myself), then you understand that syncing 2 computers is a never-ending battle. Syncing files is hard enough, but I want to share a workflow tip with everyone that will make your lives easier when switching back-and-forth between machines.
I want to show you how to sync all your Photoshop Presets (Brushes, Actions, etc.) on multiple computers. This will speed up your design workflow, and increase productivity. For example, you download and install a new set of brushes in Photoshop on your laptop, then you get home, and the new brushes have already been downloaded and installed on your desktop. (Note: you can do this for Illustrator, InDesign, etc. I'm just using PS as an example.)

1. First, you need some kind of “Syncing” service.
I use MobileMe, but there are plenty of options out there for PC users to sync fies between computers. Once you have that, upload your ~Applications/Adobe Photoshop CSX/Presets folder to your file syning service.

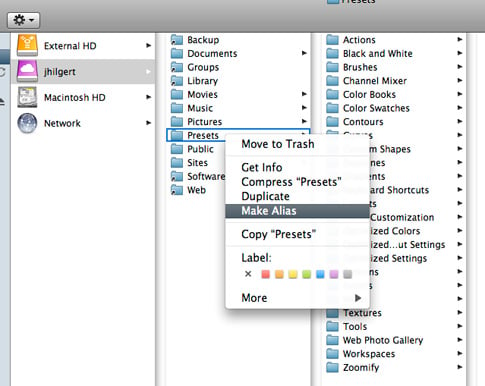
2. Create an Alias to Your Presets
I believe, for PC users, the correct term is “Shortcut,” so simply create an Alias or Shortcut to your newly uploaded “Presets” folder.

3. Replace your “Presets” folder/s with the Alias
On both of your machines, either move or delete the existing ~Applications/Adobe Photoshop CSX/Presets folders and replace them with the alias, or shortcut you created.

4. Done!
Now, all you have to do is wait for everything to sync, and your all set. Now that you've set this up, if you make changes to your Presets (add or delete Brushes, create new actions, etc.) the changes will be identical on both your machines. No more leaving a Photoshop brush set on a home computer and no more downloading everything twice 🙂 (just to give a couple examples)

