How to Select a Color in Adobe Photoshop
This page may contain links from our sponsors. Here’s how we make money.
As an image editor, graphic designer, or Photoshop artist, you'll need to be able to make all types of selections. Photoshop is a raster image editing software where pixels are used, so selecting the same colored pixels is a must-know technique.
When it comes to knowing how to change the color of clothes, backgrounds, or other objects, you'll be astonished to know that there are several tools and options within Photoshop to help you get your job done. The main thing in doing this is how you do the task using your creativity and playing with different tools.
In the next 5-10 minutes, you'll learn how to make selections of the same color or the pixels containing the same color. Here, we'll use the selections for different purposes.
So, without any further ado, let's get into the selection methods.
How to Select a Color in Photoshop
Method 1: Using the Select Sky Tool
While dealing with images including landscapes or large sky areas, you might like to select the sky to change its color or to replace the sky. The Select Sky Tool only selects the blue pixels as it is made to select the sky. These could only be done by selecting the sky entirely and applying certain changes. Let's take an example using the following image to select the sky.

After bringing your photo into Photoshop, go to Select > Sky on the above Menu Bar.

By doing this, the sky will be selected automatically. To edit this selection precisely, we would apply a layer mask. To do this, we need to select the inverse area of the image. Go to Select > Inverse on the above menu bar.

Now, we can add a layer mask over our selection. To do this, from the overhead menu bar, go to Select > Select and Mask.
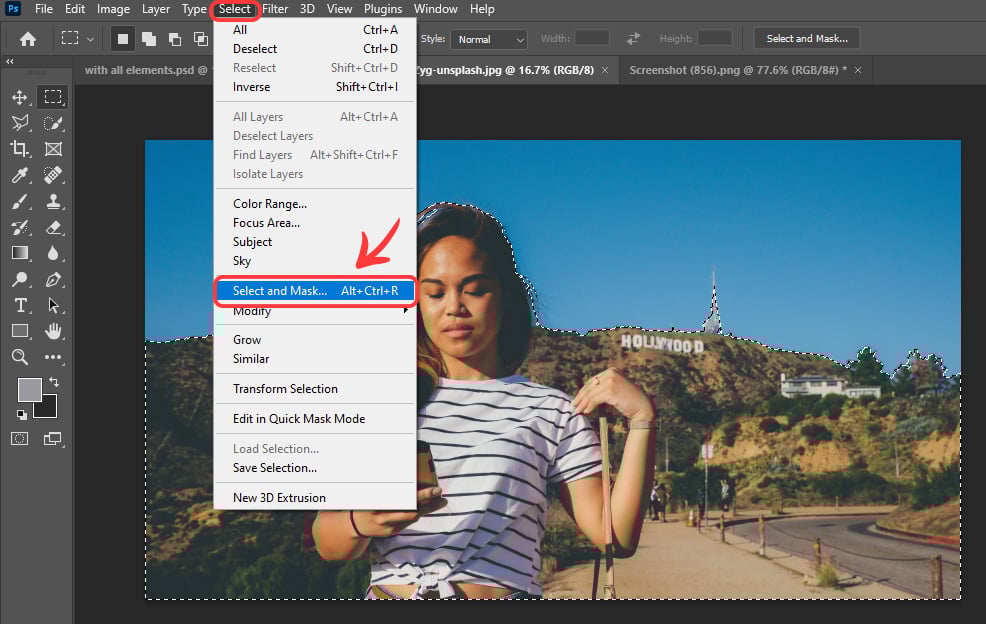
From the newly appeared window of Layer Mask options, you can edit and refine your selection precisely. After making your desired changes, you simply select New Layer with Layer Mask in Output Settings. Then click OK.

You'll get a new layer with a layer mask, and you'll notice the background is removed from your photo.

Still, if you are not satisfied with your selection, you can edit it by selecting the mask layer of the new layer and painting it black or white with Brush Tool.
And that's it. You've successfully removed the background from your photo.
Method 2: Using Magic Eraser Tool
This quick and easy method is mainly used to remove pixels of the same color from an image. This tool can be very handy when it comes to removing the background from an image. Let's take the same image as an example to understand this.
Note: This background removal method is said to be a Destructive Editing. To make it non-destructive, at first, you might want to duplicate the layer of your image to keep the original layer intact. To duplicate it, right-click on the image layer and select Duplicate Layer. Or you can use the shortcut, Control + J to duplicate it directly.
After creating a duplicate layer we simply hide the original layer behind a new duplicate layer by clicking on the small eye icon on the left of that layer. And then select the newly duplicated layer to edit.

Then, we select the Magic Eraser Tool from the Toolbar that lies under the standard eraser tool.

Now, we click on the areas of the sky until it is completely gone;

If you still see some areas where blue pixels are remaining, you can remove them by using another different tool as a standard eraser tool.

And there we go. We've got our image without the sky.
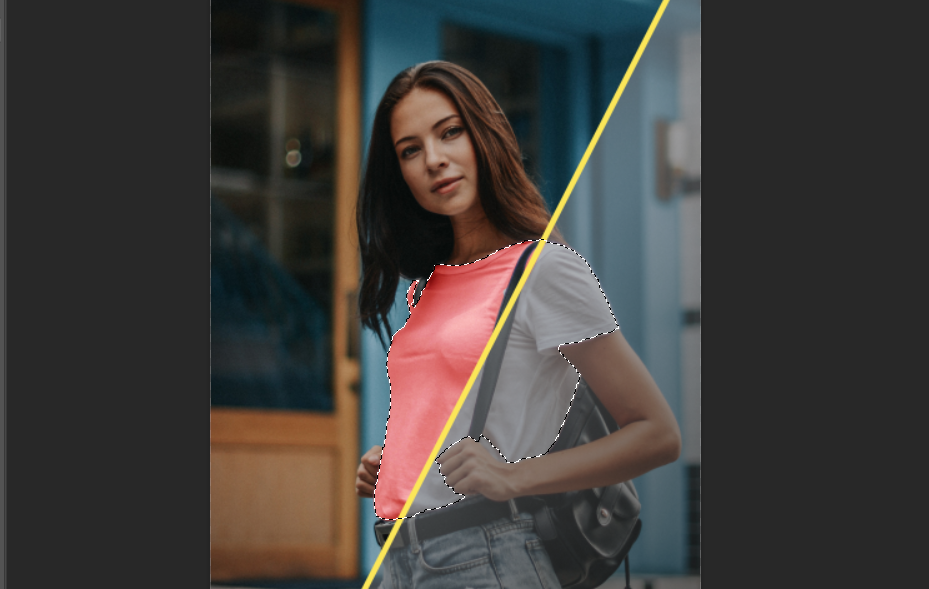
Method 3: Using Color Range Tool
The Color Range Tool is the most frequently used graphic design selection tool by Photoshop experts as it provides a more precise selection with many more options.
Let's take the following photo as an example to understand this method;

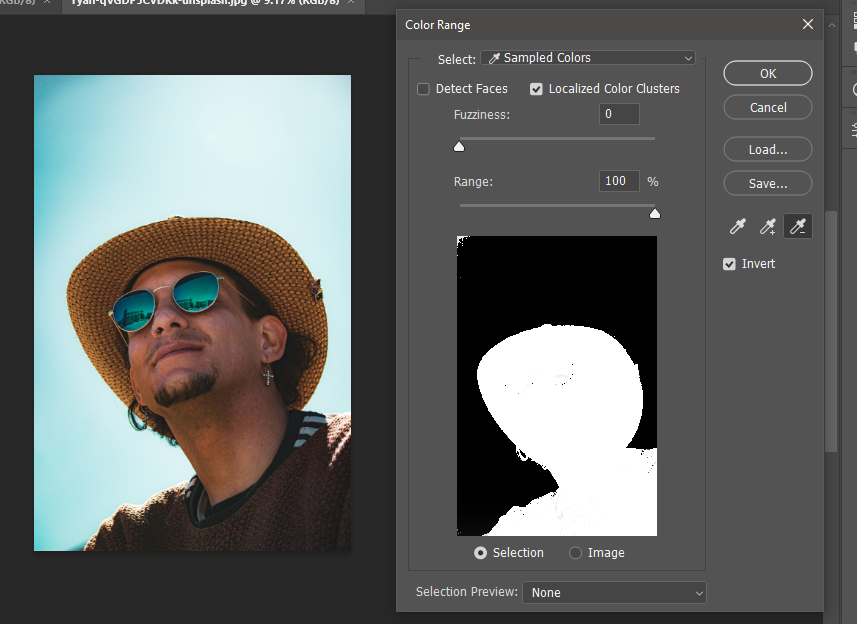
After adding the photo in Photoshop, we simply go to Select > Color Range from the above menu bar.

In the Color Range Window, set the sliders of Fuzziness and Range to 0 and 100, respectively. Select the Sample Color in the drop-down menu, tick the Invert option, and select None in Selection Preview.

Select the Eyedropper from the menu. It means that this will add up the pixels to the selection you are going to click on next.

Now, simply left-click on the areas of the image using your mouse to add to the selection. You'll notice that it will select all the pixels with the same color as the pixel you click. In Color Range Menu, the black area of the image shows the selected pixels.

To edit the selection, you can clean up the areas with pixels you do not want to select simply by selecting the – Eyedropper from the menu and directly clicking on the areas you want to remove from the selection. You'll notice that the deselected area will become white.
As you click on OK, your selection will be highlighted. Now, you can add the layer mask over your selection by going to Select > Select and Mask.

You can further edit your selection with more precision from the Layer Mask Menu. Now, select New Layer with Layer Mask in the dropdown menu of Output Settings, and click on OK.

As you click OK, you'll see that your selected area will be removed from the image. Also, you will notice that a new layer with added layer mask will be created, which means you can still edit your selection by selecting your layer mask layer and painting it black or white using the Brush Tool.

And here we go, we've got our desired result.
Method 4: Using Properties Panel
If you're working on an image you want to remove the blue background, then this tool is going to be very handy for you. This tool is also known as the Remove Background Tool. As its name says, this tool is helpful for background removal.
The Remove Background Tool is cited in the Properties Panel that you can enable by going to Window > Properties from the above menu bar.
To understand this method, let's take an example of the following image.

To enable the Remove Background Tool in the Properties Panel and to do the non-destructive editing, you would like to duplicate the original layer simply by using the shortcut, Control + J.

After creating a duplicate layer, we hide the original by clicking on the small eye icon on the left of the original layer. This will allow us to see the changes we will make on the duplicated layer and non-destructive editing.
After all this, we simply click on Remove Background under the Quick Actions on the Properties Panel. You will see that the background from the image will be removed. Also, you'll see that a new Layer Mask will be created on the duplicated layer. This means that you can still edit your selection by adding black or white paint using the Brush Tool on the layer with the mask.

In this case, I would like only the background to vanish. So I would paint the Layer with white using the Brush Tool to get the desired results.

And here it is. We've done it in no time.
Final Thoughts on Selecting Colors in Photoshop
There is a wide variety of tools in Adobe Photoshop that can be used one way or another to achieve hundreds of thousands of different results for different purposes. As a designer, one should not be stuck to only limited tools. You can achieve more precise and different results with totally different tools too. It can only be mastered by practicing more and more.
The following images were used in this article: