How to Make Swirls, Swooshes, and Curls in Adobe Illustrator
This page may contain links from our sponsors. Here’s how we make money.
Swirls and swooshes, or whatever you want to call them, are pretty hard to come by as a freebie (except here on BittBox), and they're even rarer in vector format. Part of the reason is that most people, even avid Illustrator users, don't realize how easy it is to create these shapes with a few simple tricks.
All it takes to create a swirl is a few simple yet not highly utilized Illustrator tips. I'll show you how to easily create your swirls and swooshes in Adobe Illustrator. It's not nearly as difficult as you might think. . .
And to answer all of your questions: Yes, I made all those designs on my own (with a bit of help from Vectips.com and their awesome Adobe Illustrator tutorials). The same goes for every BittBox release. All of my files are hand-made by me, not borrowed.
If this is your first time attempting a tutorial like this, I suggest following it exactly as I have it here, then going back over the process and playing with your options later.
I will outline how to do this, but you should always take my methods and play around with your options, such as stroke sizes or brush shapes. When brushes of different shapes and kinds are applied to the different geometrical figures, it results in geometrical figures of different thickness at different points and styles.
- Swoosh refers to the specific geometrical shapes that are soft and sleek on the edges.
- Swirls refer to the inter-connected pattern of sharp geometrical shapes.
- Curls refer to curved geometric shapes with random and intricate patterns.
In this tutorial, you'll learn to combine geometric shapes and form unique patterns and curls in Illustrator. Designing and combining these swooshes and swirls require a great deal of precision. An experienced designer has practiced his craft with all the different tools available in Photoshop. Adobe software has been designed so that the designer can easily adapt to all kinds of tools and crafts.
Let's Get Started
We will create a custom brush in Illustrator to help us draw these shapes a lot quicker. The first thing you need to do is use the Ellipse (circle) tool and create a circle on the artboard. Hold down the Shift key while dragging to constrain the circle. The circle shown here is the exact size I used.

Now use the Direct Selection tool (white arrow) to select the point on the right side of that circle and drag it out to the right. Like this:


Select the Convert Anchor Point tool and click on the anchor point you dragged to remove the handlebars and make it a sharp corner.


Select your shape with the Selection tool (black arrow), and in the “Brushes” palette, click on the arrow in the upper right. Select “New Brush.”


You'll get a new brush prompt. Select “New Art Brush” and hit OK.

Now you'll be given some brush options. Make sure your brush direction goes from left to right (Big to Small) like below, and hit OK. You can play with these settings later.
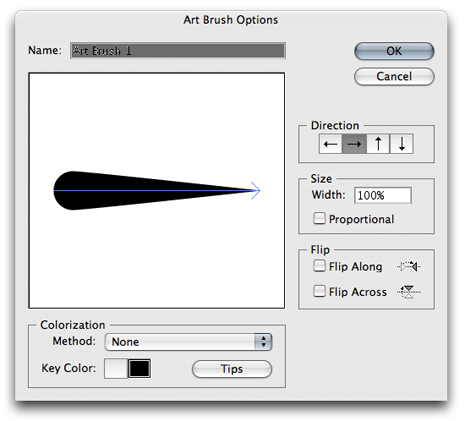
You should now see your new brush in your brushes palette.

You'll learn how to replicate a geometrical shape or create its reflection in the inverse pattern. Swirl refers to the spiral shape, and you'll learn to create a spiral shape of thick stroke. You'll also learn to combine the two geometrical shapes or swirls to appear as a single shape without any overlapping.
You'll learn to overlap two different geometrical figures so that no marks or paths are leftover. You can replicate these geometrical shapes in horizontal or vertical shape. You'll learn to make multiple geometrical shapes to overlap one over the other properly.
You can craft geometrical figures of your own, increase the stroke, fill up them with an appropriate color, combine those shapes properly to create a new geometrical shape, and create wonderful decorations to use in your ongoing projects.
You've Got Bour Brush, Now Make a Swirl or Swoosh:
Ok, it's time to make swirls in Illustrator. First, make sure you set your stroke to black, and “none” for fill, in the tools palette. Like this:

Now select the Spiral tool, and click once on the artboard without dragging to bring up the tool options. Below are the settings I used: Radius-50px, Decay-80, Segments-4. Again, play with these settings later.

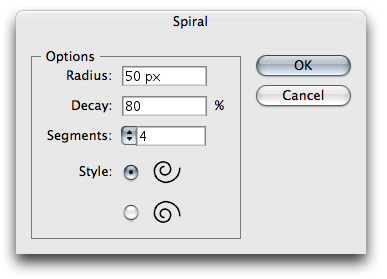
Click “OK” to create your shape, which should look like this:
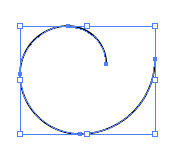
Keep your shape selected and apply your custom brush we just made by clicking on it in the “Brushes” Palette.

Your shape should now look like this:

Now adjust your stroke size in the Stroke panel to impact the width.


I rotated my shape a bit:

Combining Multiple Swirls
Now that you have your basic swirl and an easy way to quickly create more, let's combine a couple and make an interesting design. Read this section closely because if you miss a step, you might litter your Illustrator file with leftover paths that you can't see.
Use the Spiral tool to create a second swirl with these settings: Radius-30px, Decay-80, Segments-2 (detailed instructions above). And apply the same custom brush stroke. Your artboard should now look like this:

Reflect your new shape by right-clicking on it and selecting “Transform – Reflect.”

Make sure your reflect axis is Vertical and click OK
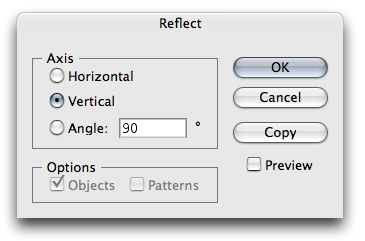
Next, Overlap your 2 shapes the way you like them. Keep them selected, go to the “Object” menu and select “Expand Appearance.”
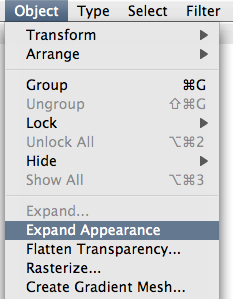
What this does is outline the brush stroke. So now you have your 2 shapes, but they have an outline AND the leftover path from the Spiral tool. We need to eliminate the leftover path so it doesn't get in the way later. Your shape should now look something like this:

Use the Direct Selection tool (white arrow) to select BOTH of your shapes, like below, and drag them away from their current position to expose the leftover spiral paths. Notice that you don't see the paths in the selection before dragging.
Now that you dragged your two filled shapes away from where they were, you can delete the leftover spiral paths.
You won't be able to see these paths, so you can do one of 2 things to find them quickly.
- Hit Control + A on the keyboard to select everything, and you'll see all your paths on the artboard.
- Hit Control + Y to view everything in outline mode.
Either way, select the leftover spiral paths and delete them. I used Control + A. Then I deselected my filled shapes by holding down Shift and clicking on them. Then I hit Delete on the keyboard.

Now that you have your fill, outlined swooshes, you can easily combine them into one shape with a single path using the Pathfinder panel. Select both shapes, and click on the first icon in the Pathfinder to combine the shapes.
Important: After combining the path, immediately click the Expand button in the same Pathfinder palette. This gets rid of any overlapping paths!

Here is the result: A single swoosh made from two, with one path!

Tips for Exploring This on Your Own:
Now you have harnessed the power of a custom brush, expanding appearance, and Pathfinder to make custom swooshes and swirls. (Wow, I guess this lesson covers a lot more than I thought.) I have a couple of tips to help you speed up your swirl-creating process:
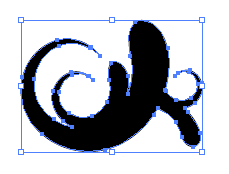
Once you create one swirl design, it's easy to copy and overlap that same design by resizing, reflecting, or rotating, to create a more complex design derived from the original. Like this:

Then combine their paths in the Pathfinder panel (detailed instructions above) by hitting the combine paths icon and Expand button in that order.

Here is the result:
Illustrator quick tip: ALWAYS keep a copy of your original shape untouched on your artboard somewhere, don't rely on “Undo.”
I hope this tutorial helps! It took me a long time to figure all of this out, but once you look at it, all it takes is a few key steps, which individually aren't that advanced even for beginner graphic designers.


