How To Clear Color Swatches in Photoshop & Illustrator
This page may contain links from our sponsors. Here’s how we make money.
As you likely very well know, Adobe Photoshop and Illustrator are very common design tools. Although they possess an incredible amount of power the overall interface can be quite cumbersome even to intermediate users. But if you spend enough time learning the fundamentals everything else will just naturally fall into place. Getting rid of swatches is not that much simple so you would have to learn this lesson to avoid getting things messed up. In this tutorial, you will learn to clear all the swatches and then imprint new swatches. You will also learn to add different colors to color swatches and replace them with different colors. Color swatches are like other elements of photoshop and illustrator. You can save a set of color swatches or favorite color swatches in the library for later use. You can choose to customize and edit each color swatch in detail.
If you are wondering what it the use of these color swatches in photoshop and illustrator, then you will come to know that these are useful in introducing new presets and colors to the whole picture. These swatches are useful in bringing the real-life experience of painting to the user. It is similar to a painter picking up and mixing different unique colors from the color palette onto his artboard.
For this quick tip, I'd like to demonstrate how to clear out color swatches in Photoshop and Illustrator. Each program has a slightly different method of clearing swatches and you'll want to stick with the most comfortable way to your workflow. The swatches panel is a little tricky and it's not always used in every design project. But it's still a palette that has plenty of value in the long run and it's worth learning these little tricks.
Swatch literally means the paint or sample applied over a particular surface.
Clearing Photoshop Swatches
So there's really only one “official” method to clear swatches from Photoshop. Unfortunately, it's a little tiresome but let's start with this and move from there.
With Photoshop open head over to the Swatches panel or choose Window > Swatches. When you hover over any swatch you'll notice the cursor turns into an eyedropper. Now hold the ALT/OPTION key and the cursor should change into a pair of scissors.
If you click on a swatch now it'll simply remove that swatch from your palette. So can you guess how to clear the entire swatches panel? Yes, it requires ALT+clicking on every single swatch until it's empty. Talk about mundane.
Fortunately, I bumped into an unconventional yet quicker alternative. This WordPress blog post offers a free swatch file that's completely empty. The .aco filetype is a Photoshop Color Swatch file that contains swatch data. By simply replacing your existing swatches with this filler swatch it'll clear your panel in a jiffy.
The first step is to download a local copy of the.ACO file. You can download it directly from the blog or grab a mirrored copy from Bittbox.
Now jump back into Photoshop and locate the tiny arrow in the top-right corner of the swatches panel. Clicking this will open a dropdown window where one of the options is “Replace Swatches”.
You may be asked if you want to save changes to the current swatches. If you don't care about the current swatch then click no, otherwise save a local copy before erasing all colors. Then browse to the .ACO file location and open it.
All of the original swatches will be replaced with a single black swatch. Now you can start adding other colors or simply remove the black swatch by ALT+clicking on the square. Now you've got a vacant swatches panel in half the time!
Clearing Illustrator Swatches
There's a distinction with the swatches panel in Illustrator: documents themselves are often tied to different swatches. Colors are pulled from the image or from a series of pre-selected swatches and this often creates one elongated swatch library.
Unlike Photoshop you cannot ALT+click to delete swatches. But there is a speedier trick you can perform within the palette's context menu. First, open a new document of any kind and then open the swatches palette using Window > Swatches.
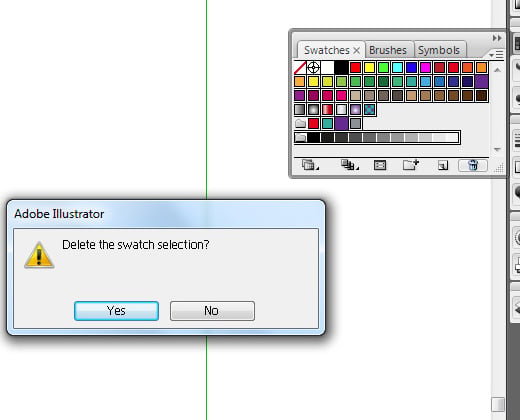
From the arrow context menu choose “Select All Unused”. If your document is blank then it should select almost all of the swatches. Now click the trash can icon and choose “yes” to the popup menu.
Even though most swatches have been deleted you may still have to deal with a few stragglers. In this case, simply SHIFT+click onto all the other swatches you want to delete. Holding shift allows you to select multiple swatches at the same time. Once they're all selected you can either drag them onto the trash can icon or merely click the icon itself.
The only two options left will be none(no color) and registration, because these can never be deleted. “None” makes the fill or stroke empty while registration is used for different reasons during printing. These are the two swatches that can never be removed so at this stage you've got a completely empty swatches palette. Now would be the time to pop the cork on that bottle of champagne you've been saving for a celebratory shindig. Color swatches have always remained the top priority for all digital artists while introducing presets or changing colors in the image.
The key to both of these techniques is memorization. If you don't frequently use the swatches panel then these techniques may become lost in the muddied thoughts of day-to-day work. But keep this post handy and use it as a reference guide whenever needed.


